How to Build a Practical Image Editing Workflow with GPT Image 2
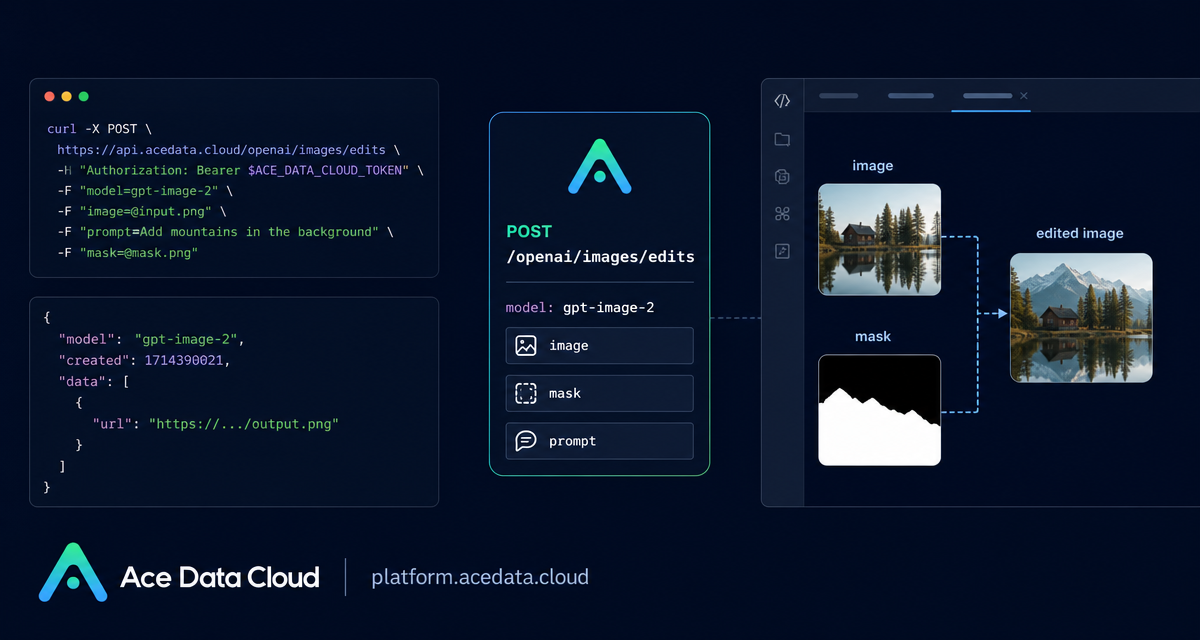
When image editing becomes part of a product workflow, the hard part is not generating one nice picture; it is preserving the right parts of an existing image while changing only the pieces your user asked for.
This guide walks through a practical workflow for using Ace Data Cloud’s GPT Image 2 / 2.5 image editing API. The goal is to keep the integration boring in the best way: predictable inputs, explicit prompts, clear constraints, and recoverable failures.
What you can do
The image editing endpoint is designed for turning an existing image into a controlled variation. You can send an image by URL, upload a local file with multipart/form-data, provide up to 16 reference images, or constrain edits with a PNG alpha mask when using the official multipart contract.
- Change a product color while keeping composition, shadows, and camera angle stable.
- Replace or restyle a background without asking the model to invent the full scene from scratch.
- Use a
maskso only a transparent region is eligible for editing. - Choose between
urlandb64_jsonresponse formats depending on how your app stores results. - Use
callback_urlfor longer running jobs instead of keeping a synchronous request open.
How it works
The API entry point is https://api.acedata.cloud/openai/images/edits. For a JSON request, the key fields are model, image, prompt, and optionally size, n, response_format, and callback_url. In JSON, image can be either one URL or an array of image URLs. For local files, use multipart upload with one or more image fields.
The model options documented for this workflow include gpt-image-2, gpt-image-2:reverse, gpt-image-2:official, gpt-image-2.5-flare, gpt-image-2.5-flare:official, gpt-image-2.5-sunburst, and gpt-image-2.5-sunburst:official. A useful mental model is simple: use gpt-image-2 as the default, flare when speed matters, and sunburst when fidelity and control matter more.
Start with URL-based editing
URL-based editing is the smallest useful integration. It works well when your application already stores source images in object storage or a CDN. The important part is to write the prompt like an editing instruction, not like a text-to-image prompt. Tell the model what must remain unchanged, then specify the edit.
curl https://api.acedata.cloud/openai/images/edits   -H "Authorization: Bearer $ACE_API_KEY"   -H "Content-Type: application/json"   -d '{
    "model": "gpt-image-2",
    "image": "https://cdn.acedata.cloud/assets/examples/gpt-image/d56455e2-e7f7-4bcd-b935-475b0a1e0948_0-18240dc44b9c.png",
    "prompt": "Keep the mug, tabletop, camera angle, portrait layout, and soft shadow unchanged. Change only the mug color from white to vivid orange and the pale cream background to solid dark navy blue. No text and no logo.",
    "size": "1024x1536"
  }'
A successful synchronous response returns fields such as success, task_id, trace_id, created, model, data, and usage. The edited image URL is inside data[0].url.
{
  "success": true,
  "task_id": "49848451-c624-4df9-9dc2-494018daaf4c",
  "trace_id": "5ac021c2-2891-4eed-bfcf-4c6668ac1be1",
  "created": 1788831893,
  "model": "gpt-image-2",
  "data": [
    {
      "url": "https://cdn.acedata.cloud/assets/examples/gpt-image/49848451-c624-4df9-9dc2-494018daaf4c_0-b6d780a732ca.png"
    }
  ],
  "usage": {
    "input_tokens": 775,
    "output_tokens": 1372,
    "total_tokens": 2147
  }
}
Upload local files when the source is not public
If your source image is generated inside a backend job, uploaded by a user, or stored privately, use multipart/form-data. The fields are straightforward: model, image, and prompt.
curl https://api.acedata.cloud/openai/images/edits -H "Authorization: Bearer $ACE_API_KEY" -F "model=gpt-image-2" -F "image=@input.png" -F "prompt=Replace the background with a bright modern studio"You can pass image repeatedly. The GPT Image series supports up to 16 reference images, which is useful for style references, product references, or before/after context. Keep the prompt explicit about the role of each reference image so the model does not guess.
Use masks for local, constrained edits
When only a region should change, use a mask with an official model such as gpt-image-2:official. The mask must be a PNG with an alpha channel, must not exceed 4MB, and must have the same dimensions as the first image. Transparent pixels with alpha 0 mark editable areas; non-transparent pixels are retained.
from PIL import Image, ImageDraw

source = Image.open("input.png").convert("RGBA")
mask = Image.new("RGBA", source.size, (0, 0, 0, 255))
draw = ImageDraw.Draw(mask)
width, height = source.size
draw.rectangle(
    (width // 4, height // 4, width * 3 // 4, height * 3 // 4),
    fill=(0, 0, 0, 0),
)
mask.save("mask.png")
Then upload the original image and mask in the same multipart request:
curl https://api.acedata.cloud/openai/images/edits -H "Authorization: Bearer $ACE_API_KEY" -F "model=gpt-image-2:official" -F "image=@input.png" -F "mask=@mask.png" -F "prompt=Keep the composition, lighting, and all objects outside the transparent mask unchanged. Inside the masked area, replace the empty tabletop with a small blue ceramic vase."Do not mix a URL source image with a local mask file. The documented mask workflow uploads both image=@input.png and mask=@mask.png in the same multipart request.
Call it from Python
If your application already uses the official OpenAI Python SDK, you can keep the familiar images.edit call and point base_url at Ace Data Cloud.
from openai import OpenAI

client = OpenAI(
    api_key="YOUR_ACE_API_KEY",
    base_url="https://api.acedata.cloud/openai",
)

with open("input.png", "rb") as image, open("mask.png", "rb") as mask:
    result = client.images.edit(
        model="gpt-image-2:official",
        image=image,
        mask=mask,
        prompt=(
            "Keep the composition, lighting, and all objects outside the "
            "transparent mask unchanged. Inside the masked area, replace "
            "the empty tabletop with a small blue ceramic vase."
        ),
    )

print(result.data[0].url)
Operational details that prevent surprises
The size field can be auto or a compliant WIDTHxHEIGHT. Width and height must be multiples of 16, the longer side must not exceed 3840, total pixels must be between 655,360 and 8,294,400, and the aspect ratio must not exceed 3:1. The n field accepts 1–10, but only 1 is supported when response_format is b64_json.
For long-running tasks, include a callback URL:
{
  "callback_url": "https://example.com/webhooks/images"
}
Common failures are usually easy to classify: 400 for image format, image count, parameter combinations, size format, or invalid masks; 401 for API key or Bearer header issues; 429 for request frequency; and 504 when you should switch to asynchronous callbacks. Error responses include a trace_id; keep that ID for debugging, but never share the API key.
Wrapping up
A reliable image editing workflow comes from reducing ambiguity: send the clearest source image you have, say what should stay fixed, use masks when boundaries matter, and capture task_id and trace_id for operations. For the complete field list and current model details, see the Ace Data Cloud OpenAI Images Edits API guide.


Comments
Post a Comment