How to Build a Server-Side Image Editing Workflow with GPT-Image-2
If your product needs image editing, the hard part is rarely the model call itself. The real challenge is building a reliable workflow around user images, reference assets, predictable output sizes, and slow-running jobs without forcing every file through a manual upload step.
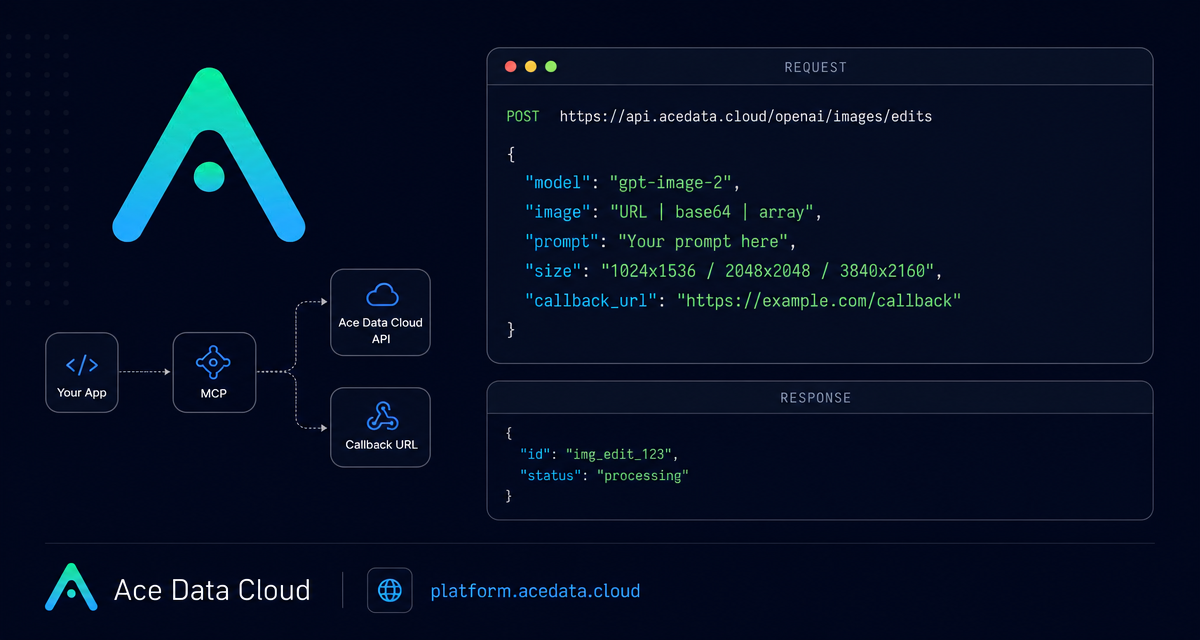
This guide walks through a practical server-side workflow using the OpenAI Images Edits API on Ace Data Cloud. The focus is gpt-image-2, because the documented editing flow supports direct image URLs, base64 input, multiple reference images, high-resolution output through size, and asynchronous callbacks.
What you can do
The edits endpoint is designed for turning one or more input images plus an instruction into a modified output image. In practical terms, you can use it to:
- Convert an existing infographic or poster into a different visual theme while preserving its layout.
- Change a product, shelf, room, or object style while keeping the original arrangement stable.
- Pass image URLs directly from your application instead of downloading files to the server first.
- Use base64 input for local images that you do not want to upload to a separate hosting service.
- Use an array in the
imagefield to provide up to 16 reference images for multi-image editing. - Request 1K, 2K, 4K, or custom dimensions through
size, as long as the value isauto, empty, or formatted asWIDTHxHEIGHT.
The core endpoint used in the documented JSON workflow is:
POST https://api.acedata.cloud/openai/images/editsHow it works
The request is intentionally small. For a JSON call with gpt-image-2, you provide:
model: for example,gpt-image-2,gpt-image-2:official, orgpt-image-2:reverse.image: a URL string, a base64 value, or an array of image references.prompt: the editing instruction.size: optional output size such as1024x1536,2048x2048,3840x2160, orauto.
The response returns a task-style result containing fields such as success, task_id, trace_id, created, data, and elapsed. The edited image URL is available under data[0].url when the request completes successfully.
One important implementation detail: the default and reverse gpt-image-2 editing route does not support multiple results from one request. The n parameter is silently ignored for these routes, so n=10 still produces one image. If your UI needs several candidates, start multiple requests concurrently rather than relying on n.
Use case 1: Theme conversion without breaking layout
A common builder need is turning an existing image into a variant for a different product surface. For example, you might have a light infographic that needs a dark-mode version for a dashboard, mobile app, or documentation page. The prompt should be explicit about what may change and what must remain stable.
curl -X POST "https://api.acedata.cloud/openai/images/edits"   -H "Authorization: Bearer {token}"   -H "Content-Type: application/json"   -d '{
    "model": "gpt-image-2",
    "image": "https://platform.cdn.acedata.cloud/gpt-image/5c9fa635-8794-4c6d-88f8-584d7f4716c6_0.png",
    "prompt": "Convert this infographic to dark mode: dark navy background, light cream text, deep gray rounded module cards with soft shadows. Keep all layout, structure, and module arrangement identical — only invert the color scheme.",
    "size": "1024x1536"
  }'
Notice the constraint in the prompt: “keep all layout, structure, and module arrangement identical.” This is the kind of instruction that makes the call useful in production. You are not asking for a new image from scratch; you are asking for a controlled transformation.
Use case 2: Multi-reference composition
The image field can also be an array. The documentation notes that up to 16 reference images can be passed simultaneously. That is useful for product bundling, style matching, or creating a final composition from separate source assets.
import requests

url = "https://api.acedata.cloud/openai/images/edits"
headers = {
    "accept": "application/json",
    "authorization": "Bearer {token}",
    "content-type": "application/json"
}

payload = {
    "model": "gpt-image-2",
    "image": [
        "https://example.com/item1.png",
        "https://example.com/item2.png",
        "https://example.com/item3.png"
    ],
    "prompt": "Combine all the items above into a single 'Relax & Unwind' gift basket on a clean white background, photorealistic, soft natural lighting.",
    "size": "1024x1024"
}

response = requests.post(url, json=payload, headers=headers)
print(response.text)
For production use, store the returned task_id and trace_id with your own job record. That gives your support and debugging workflow a stable way to connect an application action to the image editing request.
Use case 3: Local files without a separate upload step
If an image is already on disk and you do not want to upload it to a public image host first, the documented JSON workflow supports base64 input in the image field. The value may be a full data URL such as data:image/png;base64,... or raw base64.
import base64
import requests

b64 = base64.b64encode(open("input.png", "rb").read()).decode()

payload = {
    "model": "gpt-image-2",
    "image": f"data:image/png;base64,{b64}",
    "prompt": "Convert this infographic to dark mode.",
    "size": "1024x1536"
}

requests.post(
    "https://api.acedata.cloud/openai/images/edits",
    json=payload,
    headers={"authorization": "Bearer {token}"}
)
Handling long-running edits
Image editing can take long enough that keeping a client request open is not always the best architecture. The API supports an asynchronous callback flow using callback_url. In that mode, the initial response contains a task_id, and the completed result is sent as POST JSON to your callback endpoint. The callback payload includes the same task_id, so your server can attach the completed image to the correct internal job.
The documented callback result includes success, task_id, trace_id, and a nested data object containing the image editing result. Treat the callback endpoint like any other webhook: verify that it maps to a known pending job, log the trace ID, and make your handler idempotent in case your system retries downstream work.
Output sizes and validation
For gpt-image-2, size must be auto, empty, or a WIDTHxHEIGHT string. Custom sizes must follow the documented upstream constraints: both width and height are multiples of 16, the long side is at most 3840, and the total pixel count is at most 8,294,400. If your app lets users select arbitrary dimensions, validate those values before calling the API and return a helpful error in your own UI.
Good defaults are simple: use 1024x1024 for square product images, 1024x1536 for vertical posters, 1792x1024 for 16:9 1K landscape output, or auto when the model can choose.
Where this fits in a builder workflow
The useful mental model is not “generate an image.” It is “apply a constrained edit to an existing visual asset.” Keep the prompt specific, keep the source image stable, record task_id and trace_id, and validate size before the request leaves your server.
If you want the exact endpoint details, supported models, response shape, and callback examples, read the OpenAI Images Edits API Integration Guide.


Comments
Post a Comment