A Practical Guide to Editing Images with the GPT Image 2 API
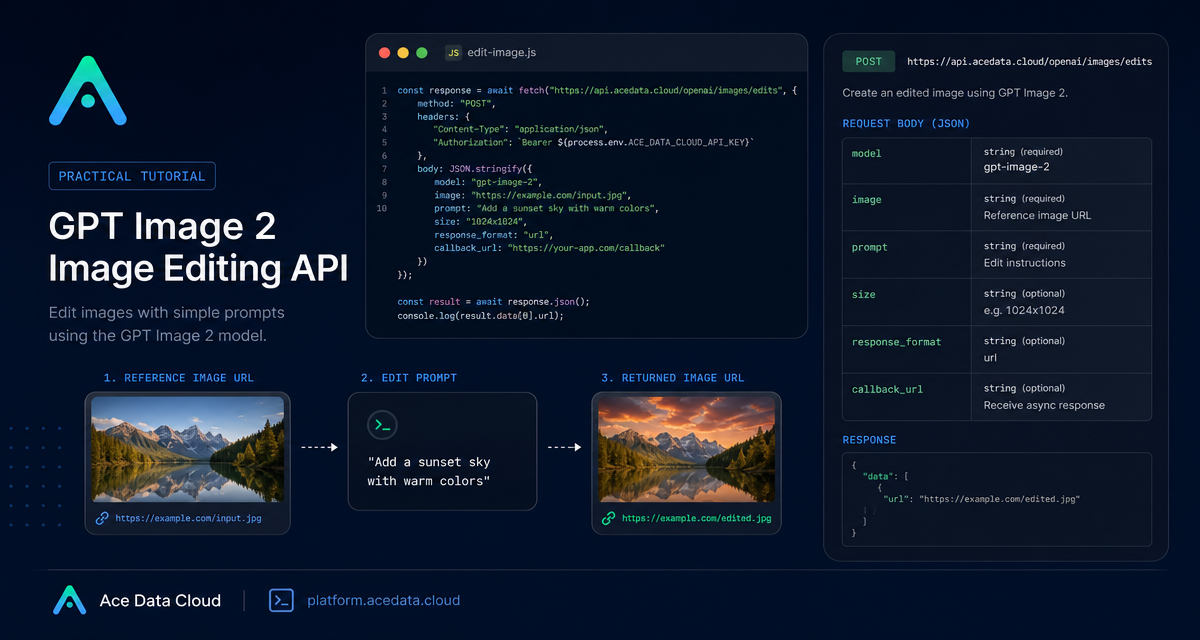
Image editing APIs are most useful when they let you keep the parts of an image that already work and change only the parts that need to move.
This guide walks through the GPT Image 2 image editing workflow on Ace Data Cloud using the documented /openai/images/edits endpoint. The goal is not to generate art from scratch, but to build a reliable editing step you can put inside a product workflow: product mockups, design variations, listing images, creative review tools, or internal content pipelines.
What you can do
The image editing API accepts an existing image and a natural-language edit instruction. The documented endpoint is:
https://api.acedata.cloud/openai/images/editsFrom the documentation, the core fields are:
model: one ofgpt-image-2,gpt-image-2:official, orgpt-image-2:reverse.image: in JSON, a single image URL or an array of up to 16 image URLs; in multipart uploads, one or more repeatedimagefile fields.prompt: the edit instruction.size:autoor a validWIDTHxHEIGHT.n: 1–10, with a documented restriction thatresponse_format=b64_jsononly supports 1.response_format:urlorb64_json.callback_url: an optional asynchronous callback address.
That is enough to model image editing as a simple function: provide source image, describe the delta, receive the edited image URL or base64 output.
How it works
The cleanest way to reason about this API is to separate reference material from the change request. The image field supplies the visual context. The prompt describes what should change and, just as importantly, what should not change.
For example, the documentation demonstrates keeping the mug, tabletop, camera angle, portrait layout, and soft shadow unchanged, while changing only the mug color and background. That pattern is worth copying in production prompts. If you care about composition, product placement, aspect ratio, or shadows, say so directly.
When size is omitted or set to auto, the model chooses the aspect ratio based on the prompt and the first reference image. If you need predictable layout for a product card, thumbnail, marketplace asset, or blog cover, pass an explicit size that follows the documented rules.
Editing from an image URL
For server-side workflows, URL input is usually the easiest starting point. Store the source asset somewhere reachable, then pass its URL in JSON.
curl https://api.acedata.cloud/openai/images/edits \
  -H "Authorization: Bearer your API Key" \
  -H "Content-Type: application/json" \
  -d '{
    "model": "gpt-image-2",
    "image": "https://platform2.cdn.acedata.cloud/gpt-image/d56455e2-e7f7-4bcd-b935-475b0a1e0948_0.png",
    "prompt": "Keep the mug, tabletop, camera angle, portrait layout, and soft shadow unchanged. Change only the mug color from white to vivid orange and the pale cream background to solid dark navy blue. No text and no logo.",
    "size": "1024x1536"
  }'
A successful synchronous response includes success, task_id, trace_id, created, model, data, and usage. The edited image URL is returned under data[].url.
{
  "success": true,
  "task_id": "49848451-c624-4df9-9dc2-494018daaf4c",
  "trace_id": "5ac021c2-2891-4eed-bfcf-4c6668ac1be1",
  "created": 1788831893,
  "model": "gpt-image-2",
  "data": [
    {
      "url": "https://platform2.cdn.acedata.cloud/gpt-image/49848451-c624-4df9-9dc2-494018daaf4c_0.png"
    }
  ],
  "usage": {
    "input_tokens": 775,
    "output_tokens": 1372,
    "total_tokens": 2147
  }
}
Uploading a local image
If your image is still local, use multipart/form-data. The documented form version uses -F fields:
curl https://api.acedata.cloud/openai/images/edits \
  -H "Authorization: Bearer your API Key" \
  -F "model=gpt-image-2" \
  -F "image=@input.png" \
  -F "prompt=Replace the background with a bright modern studio"
The same idea applies when you need multiple references. In JSON, pass image as an array of URLs. In multipart, repeat the image field. The GPT Image series supports up to 16 reference images, which is useful when you want to combine a product shot, a style reference, and a layout reference without inventing a separate asset pipeline.
Choosing size and response format
The documented size rules are specific: width and height must be multiples of 16, the longer side must not exceed 3840, and total pixels must not exceed 8,294,400. Those constraints are easy to validate before making the API call.
Use response_format="url" when the next step is display, download, review, or storage by URL. Use b64_json when you need to keep the binary payload inside your own request/response flow, remembering that n only supports 1 with base64 output.
Handling longer edits safely
For long-running jobs, add a callback_url:
{
  "callback_url": "https://example.com/webhooks/images"
}
The documented asynchronous response is a 200 response with task_id, and the final result is sent to the callback when the job completes. This is the safer pattern for background jobs, batch image tools, and user-facing workflows where a request timeout would create a poor experience.
Troubleshooting checklist
The documentation calls out a few practical status-code checks:
400: check image format, image quantity, parameter combinations, and size format.401: check the API key and Bearer authorization header.429: check request frequency.504: switch to asynchronous callback.
Error responses include a trace_id. Keep that ID when reporting issues, but do not include the API key.
Where this fits in a builder workflow
The most useful image editing workflows are usually boring in the best way: take an existing image, preserve the important parts, change one controlled thing, and return a usable asset. That makes the API a good fit for internal design tools, content operations, catalog cleanup, and lightweight creative automation.
If you want the full field list and current examples, read the OpenAI Images Edits API Integration Guide.


Comments
Post a Comment