How to Build an Image Editing Pipeline with GPT-Image-2
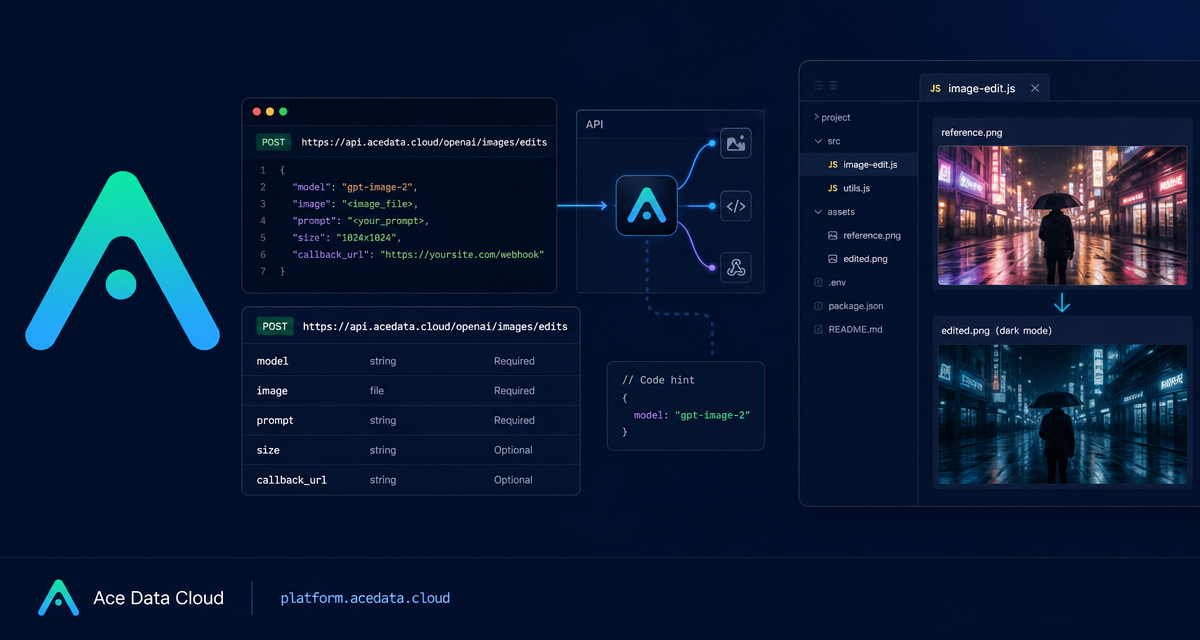
Image editing APIs become much more useful when they fit into an application pipeline: accept a reference image, apply a precise instruction, return an edited asset, and optionally hand the long-running result back through a callback.
This guide walks through the OpenAI Images Edits API on Ace Data Cloud as a practical builder workflow. The focus is not on generating a random image from scratch, but on editing an existing image while preserving the parts that matter: layout, structure, text, product arrangement, or visual composition.
What you can do
The edits endpoint accepts one or more reference images and a natural-language prompt, then returns modified images. The same interface supports gpt-image-1, gpt-image-2, and the nano-banana family, including nano-banana, nano-banana-2-lite, nano-banana-2, and nano-banana-pro.
For a typical application, the most interesting use cases are:
- Convert an infographic or UI mockup to a new visual theme while keeping the layout intact.
- Combine multiple product photos into a composed scene such as a bundle or gift basket.
- Replace a background, shelf, wall, surface, or environment while preserving object placement.
- Run server-side edits from image URLs without downloading files locally first.
How it works
The main endpoint is:
POST https://api.acedata.cloud/openai/images/editsFor gpt-image-2, Ace Data Cloud supports a JSON request body where image can be a URL, a base64 string such as data:image/png;base64,..., or an array of image references. The GPT Image series can accept up to 16 reference images. The core fields you will usually care about are:
model: for example,gpt-image-2.image: a URL, base64 value, or array of references.prompt: the edit instruction.size:auto, empty, or a value inWIDTHxHEIGHTformat.n: number of results, from 1 to 10 for supported models.callback_url: optional asynchronous callback target.
A good prompt should say both what to change and what to preserve. For editing, “keep all layout, structure, and module arrangement identical” is often more useful than a long aesthetic description.
Start with JSON and an image URL
If your input image is already hosted, JSON is the cleanest way to integrate the API from a backend job, queue worker, or internal tool. Here is a minimal request adapted from the documented dark-mode infographic workflow:
curl -X POST "https://api.acedata.cloud/openai/images/edits"   -H "Authorization: Bearer {token}"   -H "Content-Type: application/json"   -d '{
    "model": "gpt-image-2",
    "image": "https://platform.cdn.acedata.cloud/gpt-image/5c9fa635-8794-4c6d-88f8-584d7f4716c6_0.png",
    "prompt": "Convert this infographic to dark mode: dark navy background, light cream text, deep gray rounded module cards with soft shadows. Keep all layout, structure, and module arrangement identical — only invert the color scheme.",
    "size": "1024x1536"
  }'
The documented response shape includes success, task_id, trace_id, created, data, and elapsed. Each item in data can include a revised_prompt and a final image url.
Use Python for backend jobs
The same request is straightforward in Python with requests. This style works well inside a queue consumer because the request body is plain JSON and can be logged without binary file handling, as long as you never log the bearer token.
import requests

url = "https://api.acedata.cloud/openai/images/edits"

headers = {
    "accept": "application/json",
    "authorization": "Bearer {token}",
    "content-type": "application/json"
}

payload = {
    "model": "gpt-image-2",
    "image": "https://platform.cdn.acedata.cloud/gpt-image/5c9fa635-8794-4c6d-88f8-584d7f4716c6_0.png",
    "prompt": "Convert this infographic to dark mode: dark navy background, light cream text, deep gray rounded module cards with soft shadows. Keep all layout, structure, and module arrangement identical — only invert the color scheme.",
    "size": "1024x1536"
}

response = requests.post(url, json=payload, headers=headers)
print(response.text)
If you are working with local images that should not be uploaded to separate storage first, the documentation also shows that image can be sent as base64. That makes it possible to keep the whole edit operation inside your service boundary.
Choose image size deliberately
With gpt-image-2, the size field must be auto, empty, or in WIDTHxHEIGHT format. Custom sizes must use width and height values that are multiples of 16, with the long side no greater than 3840 and the total pixel count no greater than 8,294,400. Invalid values return a 400-class error.
When you omit size or pass auto, the output keeps the aspect ratio of the reference image. If you want to change the final aspect ratio, specify a concrete size such as 1024x1536, 2048x1152, or 3840x2160, as long as it fits the documented limits.
When to use multiple references
For composition workflows, pass an array in image. For example, a product bundling tool can take several product photos and ask the model to combine them into a single clean scene:
payload = {
    "model": "gpt-image-2",
    "image": [
        "https://example.com/item1.png",
        "https://example.com/item2.png",
        "https://example.com/item3.png"
    ],
    "prompt": "Combine all the items above into a single 'Relax & Unwind' gift basket on a clean white background, photorealistic, soft natural lighting.",
    "size": "1024x1024"
}
The important part is to describe the role of the references. If an object count or arrangement matters, say so explicitly. The documentation’s shelf example preserves the number and arrangement of books while changing the shelf and wall style, which is a good pattern for production prompts.
Handling longer edits with callbacks
Image edits can take time. Instead of keeping an HTTP connection open indefinitely, you can include callback_url. The API then returns a task_id, and when the edit completes, it sends a POST JSON payload to your callback URL that also includes the task_id. That lets your application associate the completed image with the original job record.
A practical production flow is:
- Create an internal job row with the input image, prompt, model, and requested size.
- Call
/openai/images/editswithcallback_url. - Store the returned
task_id. - When the callback arrives, match on
task_idand persist the returned image URL.
Closing notes
For builder workflows, the main trick is not the API call itself; it is writing edit prompts that separate “what should change” from “what must remain stable.” Start with one reference image and a precise preservation instruction. Once that works, add multiple references, explicit sizes, or callbacks as your pipeline needs them.
Full reference: OpenAI Images Edits API Integration Guide.


Comments
Post a Comment