Getting Started with Nano Banana MCP in Claude Desktop, VS Code, and Cursor
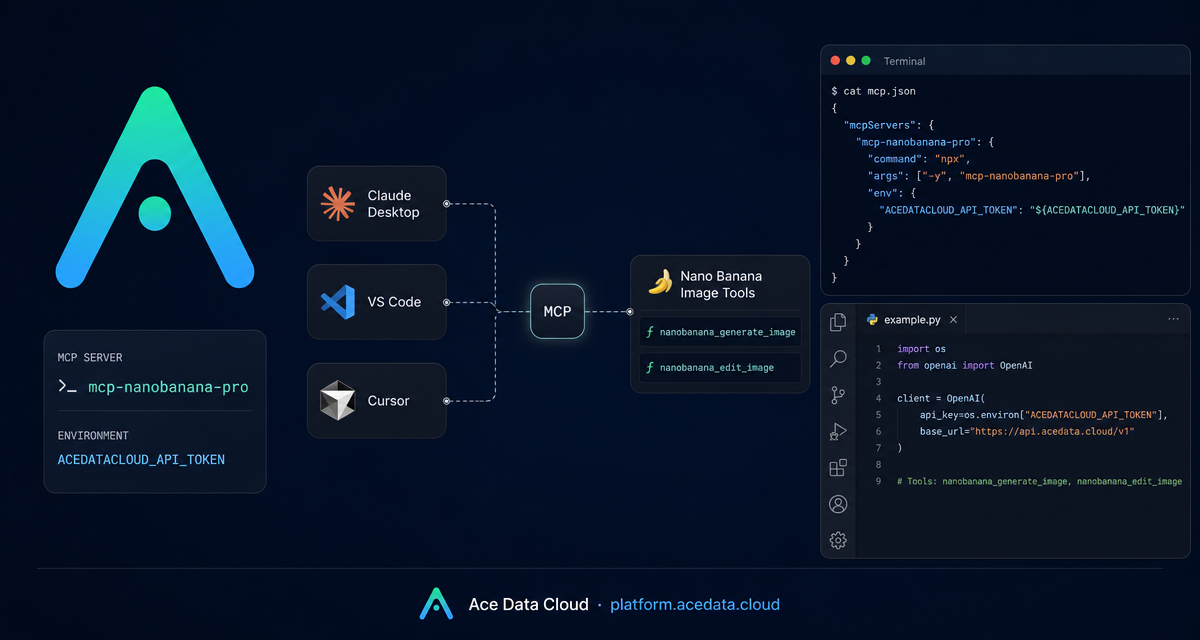
If you already use an AI coding assistant, the friction in image workflows is often not the model itself—it is the context switch. You describe an asset in chat, open another tool, upload references, wait for a result, then bring the image back into your project. The Nano Banana MCP Server gives builders a more direct path: expose image generation and editing tools inside an MCP-capable client such as Claude Desktop, VS Code, or Cursor.
What you can do
The Nano Banana MCP Server from Ace Data Cloud is documented as an MCP integration for AI image work. Once configured, it provides a small set of practical tools that an AI client can call from a conversation:
nanobanana_generate_imagefor generating images from text prompts.nanobanana_edit_imagefor editing existing images or combining multiple images.nanobanana_get_taskfor querying the status of one generation task.nanobanana_get_tasks_batchfor querying multiple task statuses.
The documented use cases are very builder-friendly: generating a watercolor landscape, editing clothing onto a person, placing a product in a café scene, or producing a high-quality portrait with the nano-banana-pro model. The server also notes support for nano-banana, nano-banana-2, and nano-banana-pro.
How it works
MCP, or Model Context Protocol, standardizes how AI clients call external tools. In this setup, your AI client launches a local command named mcp-nanobanana-pro. That command exposes Nano Banana tools to the client. Authentication is passed through an environment variable named ACEDATACLOUD_API_TOKEN.
The important idea is that you do not hard-code image logic into each prompt or editor extension. You configure one MCP server, restart the client, and then ask for image tasks in natural language. The client can route those requests to the available Nano Banana tools.
Install the MCP server
The recommended installation path in the documentation is pip:
pip install mcp-nanobanana-proIf you prefer working from source, the documented alternative is to clone the GitHub repository and install the package in editable mode:
git clone https://github.com/AceDataCloud/NanoBananaMCP.git
cd NanoBananaMCP
pip install -e .
After installation, the command you configure in your client is mcp-nanobanana-pro. Keep your API token out of source control; the examples below show the required field name but use a placeholder value.
Configure Claude Desktop
For Claude Desktop, edit the client configuration file. The documented locations are:
- macOS:
~/Library/Application Support/Claude/claude_desktop_config.json - Windows:
%APPDATA%\Claude\claude_desktop_config.json
Add an MCP server entry named nanobanana:
{
  "mcpServers": {
    "nanobanana": {
      "command": "mcp-nanobanana-pro",
      "env": {
        "ACEDATACLOUD_API_TOKEN": "Your API Token"
      }
    }
  }
}
If you use uvx, the documented configuration avoids installing the package ahead of time:
{
  "mcpServers": {
    "nanobanana": {
      "command": "uvx",
      "args": ["mcp-nanobanana-pro"],
      "env": {
        "ACEDATACLOUD_API_TOKEN": "Your API Token"
      }
    }
  }
}
Save the file and restart Claude Desktop. After restart, the Nano Banana tools should be available to the conversation.
Configure VS Code or Cursor
For VS Code and Cursor, create a project-level file at .vscode/mcp.json. The server object uses servers rather than mcpServers:
{
  "servers": {
    "nanobanana": {
      "command": "mcp-nanobanana-pro",
      "env": {
        "ACEDATACLOUD_API_TOKEN": "Your API Token"
      }
    }
  }
}
The uvx version is also supported in the documented configuration:
{
  "servers": {
    "nanobanana": {
      "command": "uvx",
      "args": ["mcp-nanobanana-pro"],
      "env": {
        "ACEDATACLOUD_API_TOKEN": "Your API Token"
      }
    }
  }
}
This project-local approach is useful when an image workflow belongs to one repo: for example, a landing page project that needs product scene images, or a design prototype where you want the assistant to generate and iterate visual assets while staying inside the editor.
A practical workflow
After the server is configured, keep prompts specific and task-oriented. Instead of saying “make a cool image,” ask the client to use the Nano Banana tools for a clear job: generate a watercolor landscape, edit a clothing item onto a person, place a product in a café scene, or generate a portrait with nano-banana-pro. For longer jobs, expect the client to check progress with nanobanana_get_task or batch-check with nanobanana_get_tasks_batch.
The cleanest pattern is: describe the target image, provide any existing reference images through the client if your workflow needs editing or combination, then ask the assistant to query the task result before using the image in your project. That keeps the creative step, the task status, and the final asset handoff in one conversation.
Closing notes
Nano Banana MCP is useful when image generation is part of the build loop rather than a separate design chore. The setup is small: install mcp-nanobanana-pro, pass ACEDATACLOUD_API_TOKEN, restart your MCP-capable client, and work through the exposed tools from chat.
For the exact installation snippets, client configuration files, and tool list, read the Nano Banana MCP Integration Guide.


Comments
Post a Comment