How to Build an Image Generation and Editing Workflow with the Nano Banana Images API
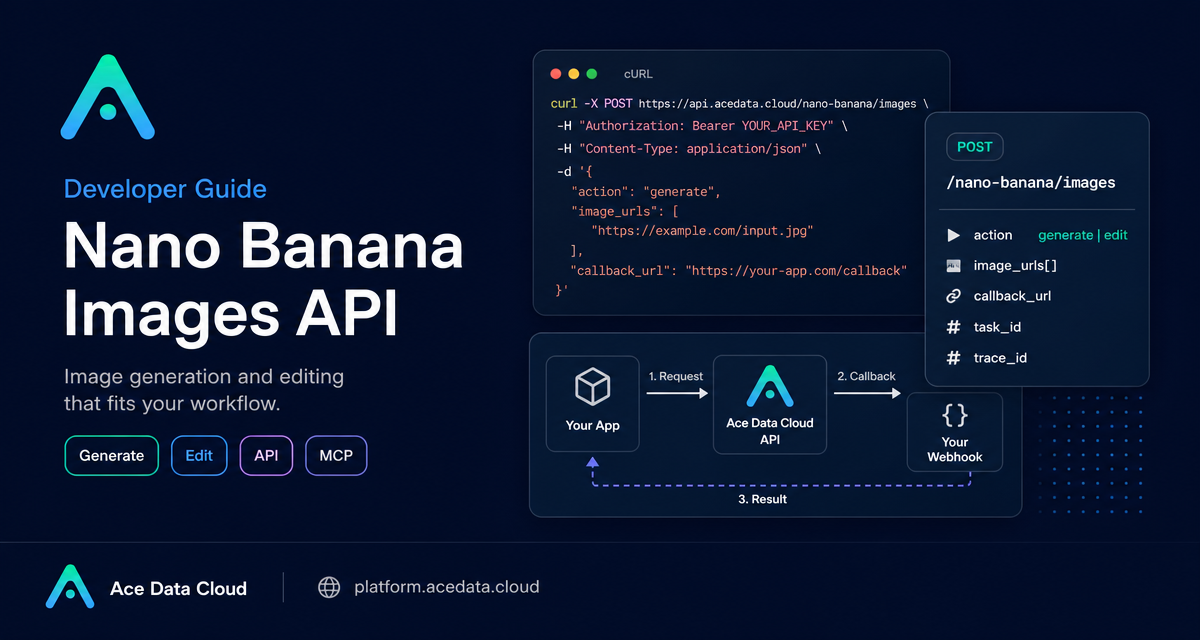
If your product needs both image generation and image editing, the annoying part is usually not the model itself. It is the workflow around it: accepting a prompt, optionally attaching reference images, tracking the result, and making the output usable inside your own app. The Nano Banana Images API gives you a single HTTP endpoint for that workflow: POST /nano-banana/images.
This guide walks through a practical integration pattern: start with synchronous calls for development, keep task_id and trace_id for debugging, then move longer-running jobs to a webhook using callback_url.
What you can do
The API supports two actions on the same endpoint:
generate: create images from a textprompt.edit: transform or combine existing images usingimage_urlsplus a textprompt.
That makes it useful for builder workflows such as product mockups, creative previews, image variations, avatar or asset generation, and reference-based editing. You can request count from 1 to 4 images. If part of a multi-image request fails, the response returns only successful images in data.
How it works
The base URL is https://api.acedata.cloud, and the image endpoint is POST /nano-banana/images. Requests are JSON and should include these headers:
authorization: Bearer {token}accept: application/jsoncontent-type: application/json
For generation, the minimum required fields are action and prompt. For editing, you still send action and prompt, but also include image_urls, an array with at least one image. The image URLs can be public HTTP or HTTPS links, or Base64 image data such as a data:image/png;base64,... value.
Choosing a model and output shape
The model field is optional. If you omit it, the default is nano-banana. The documented model options are nano-banana, nano-banana-2-lite, nano-banana-2, nano-banana-pro, and the corresponding official-channel variants: nano-banana:official, nano-banana-2-lite:official, nano-banana-2:official, and nano-banana-pro:official.
Two other optional fields are helpful when you are building a UI: aspect_ratio, for example 1:1 or 16:9, and resolution, for example 1K, 2K, or 4K. One important constraint from the docs: nano-banana-2-lite supports only 1K.
Generate an image from a prompt
A generation request is the smallest integration surface. You send a prompt, optionally choose a model, and read generated image URLs from data[].image_url. The response also includes success, task_id, and trace_id. Store those identifiers with your own job record; they make support and troubleshooting much easier.
curl -X POST 'https://api.acedata.cloud/nano-banana/images'   -H 'authorization: Bearer {token}'   -H 'accept: application/json'   -H 'content-type: application/json'   -d '{
    "action": "generate",
    "model": "nano-banana-pro",
    "prompt": "A clean product mockup on a dark desk, soft studio lighting, realistic materials, developer-tool aesthetic",
    "aspect_ratio": "16:9",
    "resolution": "1K",
    "count": 1
  }'
A successful response follows this shape:
{
  "success": true,
  "task_id": "70e6931b-6e34-43db-9e36-8765e2809d04",
  "trace_id": "60df8d38-f265-4986-aec7-75c9220bced2",
  "data": [
    {
      "prompt": "A clean product mockup on a dark desk...",
      "image_url": "https://platform2.cdn.acedata.cloud/nanobanana/example.png"
    }
  ]
}
Edit with one or more reference images
Editing uses the same endpoint, but the request body changes to action: edit. Pass reference assets in image_urls and describe the transformation in prompt. For example, you might combine a person photo and a shirt image, or apply a consistent style to a set of product shots.
import requests

url = "https://api.acedata.cloud/nano-banana/images"
headers = {
    "authorization": "Bearer {token}",
    "accept": "application/json",
    "content-type": "application/json",
}
payload = {
    "action": "edit",
    "prompt": "Place the product into a clean SaaS landing-page hero scene while preserving the original object shape",
    "image_urls": [
        "https://cdn.acedata.cloud/example-product.png"
    ],
    "count": 1
}

resp = requests.post(url, json=payload, headers=headers)
result = resp.json()
print(result.get("task_id"), result.get("trace_id"))
for item in result.get("data", []):
    print(item["image_url"])
Use callbacks for production jobs
During local development, waiting for the HTTP response is convenient. In production, long-running image jobs are easier to manage with callback_url. Add a publicly accessible webhook URL to the request body, and the API can return a task identifier first, then send the completed JSON payload to your webhook with POST.
The callback payload uses the same successful response structure: success, task_id, trace_id, and data containing generated image_url values. In your database, treat task_id as the job key and trace_id as the debugging handle.
Error handling checklist
Plan for the documented error shape:
{
  "success": false,
  "error": {
    "code": "api_error",
    "message": "Internal server error."
  },
  "trace_id": "2cf86e86-22a4-46e1-ac2f-032c0f2a4e89"
}
Common codes include token_mismatched for invalid parameters, invalid_token for missing or failed authentication, too_many_requests for request-frequency limits, and api_error for server exceptions. Log the full error object and the trace_id, but do not expose your bearer token in logs.
The nice thing about this API shape is that it stays small: one endpoint, two actions, and a predictable response. Start with generate, add edit when your workflow needs reference images, and switch to callback_url when you want reliable background processing. For the full parameter list and examples, see the Nano Banana Images API documentation.


Comments
Post a Comment