How to Build a Reliable Image Editing Workflow with GPT-Image-2
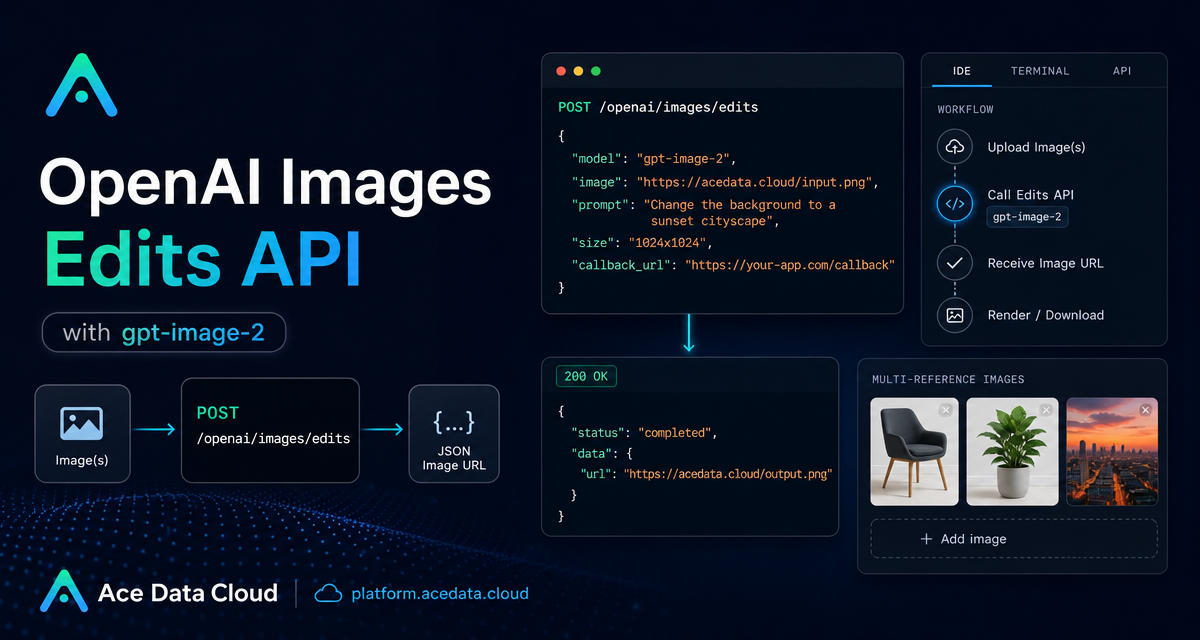
Image editing workflows get fragile when every step requires a local file download, a manual upload, and a prompt that accidentally changes the parts of the image you wanted to preserve.
This guide walks through a practical way to build an image editing pipeline with the Ace Data Cloud OpenAI Images Edits API, focusing on gpt-image-2, URL-based input, multi-image references, SDK compatibility, and callback-based jobs.
What you can do
The edits endpoint accepts an existing image plus an instruction, then returns a modified image. The documented interface supports models including dall-e-2, gpt-image-1, gpt-image-2, and the nano-banana family through the same editing interface.
For a builder, the useful part is not only “edit an image.” It is the ability to fit editing into a repeatable system:
- Turn an existing infographic into a dark-mode version while keeping its layout.
- Replace a product background without changing the main object arrangement.
- Use several reference images to compose a single result.
- Send image URLs directly in JSON instead of downloading files first.
- Use asynchronous callbacks when an edit may take longer than a normal HTTP request should block.
How it works
The JSON workflow posts to https://api.acedata.cloud/openai/images/edits. At minimum, the request needs an authorization header and a payload containing model, image, and prompt. With gpt-image-2, the image field can be a URL, an array of image URLs, or base64 data such as data:image/png;base64,....
The size field can be auto, omitted, or provided in WIDTHxHEIGHT format. The documented custom-size constraints are: width and height must be multiples of 16, the long side must be no more than 3840, and the total pixel count must be no more than 8,294,400. Recommended examples include 1024x1024, 1024x1536, 1792x1024, 2048x2048, and 3840x2160.
One important implementation detail: the default gpt-image-2 editing route does not support n > 1. Passing n=10 still produces one image. If you need multiple candidates, issue multiple requests concurrently. The documented exception is gpt-image-2:official, which supports n > 1, while gpt-image-2:reverse is equivalent to the default route.
Edit an image from a URL
URL input is often the simplest server-side path. Your backend can store the original image in object storage or a CDN, then pass that URL directly to the API.
curl -X POST "https://api.acedata.cloud/openai/images/edits" \
  -H "Authorization: Bearer {token}" \
  -H "Content-Type: application/json" \
  -d '{
    "model": "gpt-image-2",
    "image": "https://platform.cdn.acedata.cloud/gpt-image/5c9fa635-8794-4c6d-88f8-584d7f4716c6_0.png",
    "prompt": "Convert this infographic to dark mode: dark navy background, light cream text, deep gray rounded module cards with soft shadows. Keep all layout, structure, and module arrangement identical — only invert the color scheme.",
    "size": "1024x1536"
  }'
The same request in Python looks like this:
import requests

url = "https://api.acedata.cloud/openai/images/edits"
headers = {
    "accept": "application/json",
    "authorization": "Bearer {token}",
    "content-type": "application/json"
}
payload = {
    "model": "gpt-image-2",
    "image": "https://platform.cdn.acedata.cloud/gpt-image/5c9fa635-8794-4c6d-88f8-584d7f4716c6_0.png",
    "prompt": "Convert this infographic to dark mode: dark navy background, light cream text, deep gray rounded module cards with soft shadows. Keep all layout, structure, and module arrangement identical — only invert the color scheme.",
    "size": "1024x1536"
}

response = requests.post(url, json=payload, headers=headers)
print(response.text)
A successful response contains fields such as success, task_id, trace_id, created, data, and elapsed. The edited image URL is returned under data[0].url, and data[0].revised_prompt may mirror the final prompt used for the edit.
Use multiple reference images
When the target result depends on several inputs, pass an array to image. The documentation notes that up to 16 reference images can be provided. This is useful for product bundles, mood boards, layout references, or before-and-after style transfer.
payload = {
    "model": "gpt-image-2",
    "image": [
        "https://example.com/item1.png",
        "https://example.com/item2.png",
        "https://example.com/item3.png"
    ],
    "prompt": "Combine all the items above into a single 'Relax & Unwind' gift basket on a clean white background, photorealistic, soft natural lighting.",
    "size": "1024x1024"
}
The key is to make the prompt explicit about what should be preserved. For example, “combine all items” is different from “use these as loose inspiration.” If layout or count matters, say so in the prompt.
Use the OpenAI SDK style when you already upload files
If your existing code uses the OpenAI Python SDK and multipart/form-data, the documented path is to set the base URL and API key, then call client.images.edit with model="gpt-image-2".
export OPENAI_BASE_URL=https://api.acedata.cloud/openai
export OPENAI_API_KEY={token}
import base64
from openai import OpenAI
client = OpenAI()
result = client.images.edit(
model="gpt-image-2",
image=[open("test.png", "rb")],
prompt="Convert this image to dark mode while keeping the layout intact."
)
image_base64 = result.data[0].b64_json
image_bytes = base64.b64decode(image_base64)
with open("edited.png", "wb") as f:
f.write(image_bytes)This path is convenient for local tools, CLI utilities, or internal dashboards where the input image is already on disk. For distributed systems, JSON plus URL input usually removes one moving part.
When to use callbacks
Image editing can take time. Holding an HTTP connection open is acceptable for quick prototypes, but less ideal for production queues. The documented asynchronous pattern adds a callback_url field. The initial request returns a task_id, and the completed result is later sent to your callback URL as a POST JSON payload containing the same task_id.
curl -X POST "https://api.acedata.cloud/v1/images/edits" \
  -H "Authorization: Bearer {token}" \
  -F "model=gpt-image-1" \
  -F "image[]=@test.png" \
  -F "prompt=Create a lovely gift basket with these items in it" \
  -F "callback_url=https://webhook.site/3d32690d-6780-4187-a65c-870061e8c8ab"
The immediate response is small:
{
  "task_id": "6a97bf49-df50-4129-9e46-119aa9fca73c"
}
Later, your webhook receives a result object with fields such as success, task_id, trace_id, and data. This makes it easier to connect the image result back to your own job table.
Handle errors as part of the workflow
The API returns structured error responses. The documentation lists common cases such as 400 token_mismatched, 400 api_not_implemented, 401 invalid_token, 429 too_many_requests, and 500 api_error.
{
  "success": false,
  "error": {
    "code": "api_error",
    "message": "fetch failed"
  },
  "trace_id": "2cf86e86-22a4-46e1-ac2f-032c0f2a4e89"
}
In practice, store trace_id with your job logs. It gives you a stable identifier when debugging failed image edits or correlating a callback with a user action.
A small production checklist
- Prefer URL or base64 input for backend pipelines.
- Use
sizeonly in documented forms such asautoorWIDTHxHEIGHT. - Do not rely on
n > 1for the defaultgpt-image-2editing route. - Use
callback_urlfor long-running jobs. - Log
task_idandtrace_id.
That is enough to build a useful image editing workflow without turning the integration into a one-off script. Start with the URL-based JSON call, add callbacks when you need queue reliability, and keep the prompt specific about what should change and what must remain stable.
Read the full reference in the OpenAI Images Edits API Integration Guide.


Comments
Post a Comment