How to Build an Image Editing Pipeline with GPT-Image-2
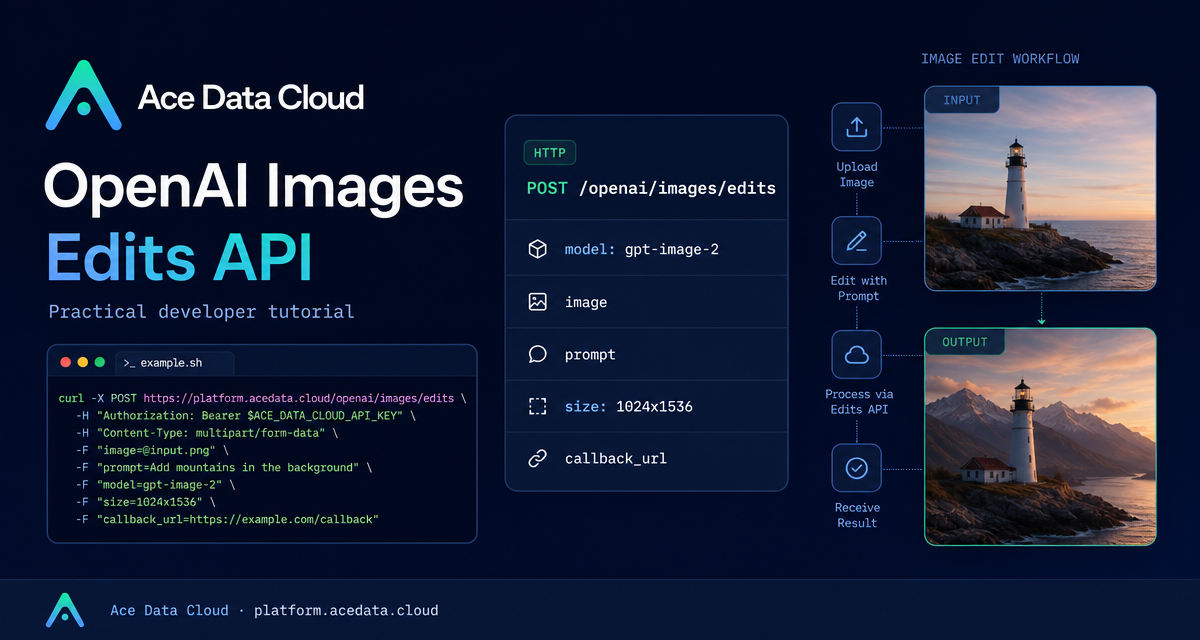
Image editing APIs become much more useful when they fit into an existing developer workflow: accept a source image, apply a precise instruction, return an edited asset, and avoid forcing your backend to download and re-upload files unnecessarily.
This guide walks through a practical way to use the Ace Data Cloud OpenAI Images Edits API with gpt-image-2. The goal is not to generate a one-off demo image, but to design a small pipeline you can reuse for product images, posters, infographics, internal design tools, or automated content workflows.
What you can do
The Images Edits API accepts one or more input images plus a text instruction, then returns modified images. According to the integration documentation, the same editing interface supports models including dall-e-2, gpt-image-1, gpt-image-2, and the nano-banana model family.
For many builder workflows, gpt-image-2 is the most interesting option because the documentation highlights several practical behaviors:
- It can preserve layout and composition while changing style, color, or background.
- It is designed to retain text more accurately in assets such as posters, menus, and infographics.
- It supports image URLs in JSON, so a server-side job can pass an existing CDN URL directly.
- The
imagefield can also accept base64 input, includingdata:image/png;base64,...or raw base64. - The
sizeparameter can request 1K, 2K, 4K, or custom output sizes that follow the documented constraints.
How it works
The recommended JSON call goes to:
POST https://api.acedata.cloud/openai/images/editsThe core fields are straightforward:
model: for example,gpt-image-2.image: an image URL, a base64 string, or an array of image references.prompt: the editing instruction.size: optional forgpt-image-2, usingautoorWIDTHxHEIGHT.
The documented response includes fields such as success, task_id, trace_id, created, data, and elapsed. Each item in data can include a final image url and a revised_prompt.
Use case 1: edit an image directly from a URL
If your app already stores uploaded images on a CDN, the JSON URL flow is the simplest path. You do not need to download the file to your backend first; pass the URL in image and describe the change in prompt.
curl -X POST "https://api.acedata.cloud/openai/images/edits" \
  -H "Authorization: Bearer {token}" \
  -H "Content-Type: application/json" \
  -d '{
    "model": "gpt-image-2",
    "image": "https://platform.cdn.acedata.cloud/gpt-image/5c9fa635-8794-4c6d-88f8-584d7f4716c6_0.png",
    "prompt": "Convert this infographic to dark mode: dark navy background, light cream text, deep gray rounded module cards with soft shadows. Keep all layout, structure, and module arrangement identical — only invert the color scheme.",
    "size": "1024x1536"
  }'
This pattern is especially useful for queues: a user uploads an image, your app stores the URL, and a worker submits the edit request with a deterministic prompt.
Use case 2: combine multiple reference images
The documentation notes that image can also be an array, with up to 16 reference images. That makes the endpoint useful for composition tasks such as turning separate product shots into a single scene.
import requests

url = "https://api.acedata.cloud/openai/images/edits"
headers = {
    "accept": "application/json",
    "authorization": "Bearer {token}",
    "content-type": "application/json",
}

payload = {
    "model": "gpt-image-2",
    "image": [
        "https://example.com/item1.png",
        "https://example.com/item2.png",
        "https://example.com/item3.png",
    ],
    "prompt": "Combine all the items above into a single 'Relax & Unwind' gift basket on a clean white background, photorealistic, soft natural lighting.",
    "size": "1024x1024",
}

response = requests.post(url, json=payload, headers=headers)
print(response.text)
For production, keep the prompt specific about what must stay unchanged. If the number, order, or placement of objects matters, say so directly.
Use case 3: choose output size deliberately
For gpt-image-2, size may be auto, omitted, or written as WIDTHxHEIGHT. The documented custom-size constraints are important: both width and height must be multiples of 16, the long side must be no more than 3840, and the total pixel count must be no more than 8,294,400.
The guide lists common examples such as 1024x1024, 1024x1536, 2048x2048, 3840x2160, and 2160x3840. In practice, I would map these to product requirements: square for catalog assets, portrait for mobile content, and landscape for blog or documentation headers.
Use case 4: make long-running edits asynchronous
Image editing can take time. The API supports an asynchronous callback pattern through callback_url. When you include that field, the initial response can return a task_id. After completion, the result is sent as a POST JSON payload to your callback URL, also including task_id so you can match the result to the original job.
curl -X POST "https://api.acedata.cloud/v1/images/edits" \
  -H "Authorization: Bearer {token}" \
  -F "model=gpt-image-1" \
  -F "image[]=@test.png" \
  -F "prompt=Create a lovely gift basket with these items in it" \
  -F "callback_url=https://webhook.site/3d32690d-6780-4187-a65c-870061e8c8ab"
A minimal callback-aware backend usually stores task_id, original asset ID, requested model, prompt, and job status. When the callback arrives, update the job with the returned image URL or error payload.
A note on Nano Banana models
The same editing endpoint also supports the nano-banana series, but the documented parameter range is narrower. Through the OpenAI-compatible adaptation layer, Nano Banana supports only model, prompt, and image. Parameters such as mask, n, size, and response_format are not supported and are ignored if provided.
curl -X POST "https://api.acedata.cloud/openai/images/edits" \
  -H "Authorization: Bearer {token}" \
  -F "model=nano-banana" \
  -F "prompt=add a green leaf on top of the apple" \
  -F "image=https://platform.cdn.acedata.cloud/nanobanana/6870b330-65c4-436c-bb80-819fdae7a7a4.png"
Practical implementation checklist
- Use JSON URL input when your images are already hosted.
- Use base64 or multipart upload when the source file is local or private.
- Keep prompts explicit about what should change and what should remain fixed.
- Validate
sizebefore sending the request to avoid invalid dimensions. - Use
callback_urlfor background jobs instead of holding open long HTTP requests. - Handle documented error codes such as
invalid_token,too_many_requests, andapi_error.
The main takeaway: treat image editing as a normal backend job. Store inputs, submit a clear edit instruction, track task_id when needed, and persist the final returned URL. For the full reference and examples, read the OpenAI Images Edits API Integration Guide.


Comments
Post a Comment